
Growing up in Bavaria meant growing up with a rich culture of sweet dishes. My top favorite food as a child was „Dampfnudeln“. This is a lightly sweetened yeast dumpling, baked in a buttered dutch oven. The bottom of the dutch oven is sprinkled with a little sugar and covered with milk. The dumplings are put in side by side and covered with the lid, as tight as possible, to keep the steam in and baked in the oven. The classic version is steamed and shouldn’t brown on top, but we never made it this way. We liked our Dampfnudeln to be golden brown on top and gooey, caramelized on the bottom. To give you a way to compare: They are light and airy and about as sweet as Challah.
Once out of the oven, they are pulled apart into single dumplings and plated. At the table you pull them apart with two forks, to ensure that the bites stay fluffy, fragrant and steaming. Cutting would compress everything to a sticky lump and take out all the fun.
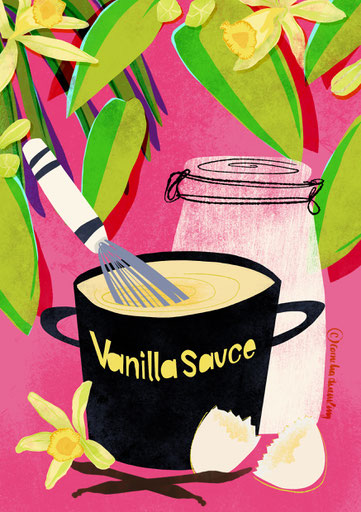
Dampfnudeln are always paired with either a sauce or a compote. Though we would eat it often with canned plum compote from our own plums, the most classic and widely accepted sidekick is vanilla sauce. Lots and lots of it. One more reason to carefully pull the bites apart with two forks: The fluffier the single bites stay, the better you can mop up the vanilla sauce! Dampfnudeln with vanilla sauce belong to the cold time of the year. For the young me it was heaven to come home from sledding, cold and red cheeked, and being greeted by the smell of Dampfnudeln and vanilla sauce. Best of all: it was considered to be a full meal! You remember the days when something sweet was declared a complete meal? Pure bliss!
So, clearly, vanilla sauce has a special place in my culinary heart. But it is also a versatile and trusty co-star to many other desserts and therefore something worthy to be added to your repertoire.
Even though I grew up with the version made from a little packet, which contained mostly starch, food coloring and artificial vanilla aroma, I learned to make it from scratch later. It is not really hard, once you know what to do.
The most elegant version consists only of milk, vanilla bean, sugar, and eggs or egg yolks. The eggs provide the lovely, pale yellow color (no food coloring needed!) and thicken the sauce, and the vanilla contributes all the taste. If you add a pinch of salt, it tastes even more luxurious. The only difficulty is preventing the eggs from curdling. You need to carefully monitor the milk-egg mixture and stir continously to keep them from overheating in places, and ending up with curdles in your sauce. I guess this is why most people are too intimidated to try it.
But there are several ways around this problem:
- You can use only the egg yolks. Egg yolks and egg whites have slightly different temperatures at which they cook. By eliminating the egg whites it is easier to stay in the „non-curdling-zone“.
- You can beat the egg yolks with a few tablespoons of milk, and add the hot sugared milk in a thin stream while whisking. Then place it on the burner again; or over a bain marie to be extra safe, and whisk until it thickens.
- Or you can reduce the amount of eggs and add a little bit of starch. In this case the eggs, a little cold milk and the starch are mixed separately. Once the milk starts to boil, you reduce the heat to medium, and start whisking. Pour in the egg-milk-starch mixture and keep on whisking until the sauce has thickened. Remove from the heat and let cool to room temperature.This version is by far the easiest without taking away from taste, texture, or color. It is quick, uncomplicated and delicious, and the way I make it at home. It is very hard to mess up this version. It would have to boil for several minutes without stirring, or something like that. But in case you messed it up and it curdled without burning (a feat in itself!), you can drive it through a fine meshed sieve. That should eliminate the curdles enough to make it enjoyable again.
I hope, you lost your concerns about making a decent vanilla sauce from scratch. If you want to give it a try, here is my trusty recipe:
Homemade Vanilla Sauce
You‘ll need:
1/2 l wholefat milk
1 pinch salt
30 g sugar
1/2 vanilla bean
2 egg yolks (preferably medium sized eggs)
2 struck tsps corn starch
Pour about 50 ml cold milk into a clean twist off jar. The milk has to be cold, because the starch would start to thicken and clump if you‘d use warm milk. A reused jam jar is fine for this. Pour the remaining milk into a pot, big enough to hold the milk and give you enough space to stir comfortably. A pot that can contain 1 l should be perfect.
Add the pinch of salt and the sugar. By adding them to the liquid, they will dissolve while the milk heats up and you have no work with that.
Cut the vanilla bean lengthwise and scrape out all the seeds. Add the seeds to the milk. You can give the milk a few whisks to disperse the vanilla seeds evenly.
Separate the egg yolks from the egg whites. Keep the egg whites for another dish if you want, if you have no use during the same day, discard them. Add the egg yolks to the starch and milk in the twist off jar. Close the lid thightly and SHAKE it baby! In all the years of working with starch this is my prefered method. The shaking is much easier than whisking, and if you shake very thouroughly there will be no clumps. But you have to shake very well, in order to dissolve the starch that tends to stick to the lid. But when you take care of that, this is the way that produces the least starch clumps. And you need no extra whisk, or spoon. I am always for saving dishes. Less work that way, right?
Once the milk starts to boil, reduce the heat to medium. This is necessary to prevent the milk from boiling over. Who wants to clean that mess anyway? And it gives you the control and time necessary to whisk in the egg-starch mixture. You need to whisk it in swiftly, so that it is evenly mixed with the hot milk. Once you did that you can slow the speed of your whisking. It only needs to prevent the sauce from sticking to the bottom of the pot and burning. After maybe 30 seconds the sauce should start to thicken. Lazily bursting bubbles should drift up. Now you can remove the sauce from the heat and let it cool to room temperature.
If you want to keep your sauce from building a skin, just give it a quick whisk every five or ten minutes. If you are in a hurry, set the pot into a icewater bath. But make sure it doesn‘t reach higher than half the height of the pot. Else the water is going to slosh into the sauce when you stir.
A little word about the ingredients: I prefer wholefat milk, it is fat enough to give the sauce a slight creaminess without feeling overpowering in the mouth. Fat reduced or even skim milk are not doing the job here. You can go that route if it is important to you, it is your choice after all, but then chances are, you need more sugar to make it satisfying. I prefer the fat. But as so often in cooking: The one who cooks is the one who decides. And I hope you feel free to decide after your own needs and tastes, even if it is different from what I would do.
But in general use the best quality of ingredients you can afford. A vanilla sauce made from free pasture whole fat milk, organic eggs, real vanilla, and a decent salt will taste different from one made of UHT milk, eggs out of the laying battery, artificial vanilla aroma and the cheapest salt you can get. The most expensive ingredient is the vanilla bean. To make the most use of it, place the empty bean in a jar with sugar. The aroma is so strong, that you can make your own vanilla sugar with it. This is how I make most of my vanilla sugar. I collect all the empty beans and put them in my sugar jar. I guess at any given time there are the remnants of two or three beans in my sugar jar. I use the sugar up and refill and the aroma is still enough to keep this going for several months.
Once the vanilla sauce has cooled, you can fill it in glass jars with a lid (or whatever you prefer) and store them in the fridge for two or three days. But, honestly, it never keeps that long in our household.
Write a comment